


To start from the beginning (highly recommended if you haven’t already) go here.
In this lesson (the last part of Chapter 2) you’ll be learning how to use the center part of MagicaVoxel 0.98. As promised in the last section, I’ll explain my reasoning behind skipping this part. I found that it’s best to learn the essentials of the program before getting started, and if you knew how to use the middle part, you probably wouldn’t read the rest of the tutorial.
Open up the program if it isn’t already open. As always, you’ll be greeted with the default screen.

We’ll be focusing on the sections shown below.
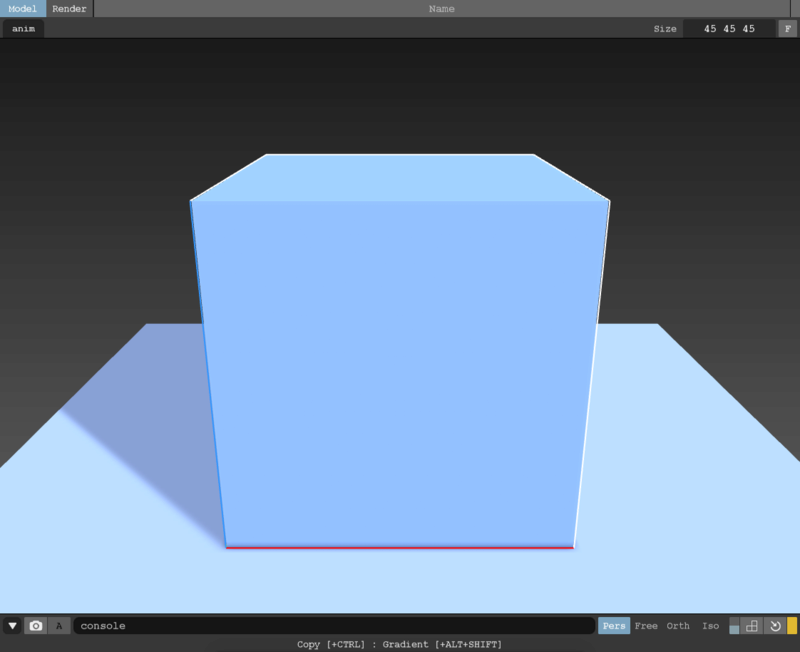
The two tabs in the top left, “Model” and “Render”, switch the main view between editing mode and viewing mode, also known as modeling and rendering mode.

The big long bar with the word “Name” in the center presents the name of the model that’s currently open. Click it to rename your model. There is a small button at the very right of this bar. It will turn orange when changes are made to your model. Click it to save your model.

The tab directly below “Model” and “Render” is titled “anim”. We’ll be covering this in a later chapter, but as an overview, clicking on this will allow you to animate your model.

Near the lower right of the name bar is a text field with the word “Size” to the left of it and the letter “F” to the right. The text field allows you to resize the canvas are of your model. The maximum size is 126x126x126. Put spaces in between numbers to separate them. Type one number without spaces and hit “Enter” or “Return” on your keyboard to make all canvas dimensions that number. The “F” to the right of the text field fits the canvas size to the current size of your model.

The large view in the middle, also known as the model view, is where you edit your model. To edit your model, select a button from the sidebar directly to the left of it, such as “Attach”, “Erase”, or “Paint”. The functions of these buttons are explained in the first part of Chapter 2. To use the selected function, left click on a block in the model area. If you right click and drag in the model view, the view will orbit around the center of the model. If you orbit and explore the model area, you will see a green, blue, and red line. The green line is the y axis, the blue line is the z axis, and the red line is the x axis. The white lines surrounding the model are the canvas boundaries.

To the lower left of the model view are two buttons. One looks like a camera and the other is the letter “A”. The camera takes a screenshot of the current model view. The “A” toggles the alpha channels of the screenshot (I’m not sure what this does yet).

The long black bar underneath the model view should have the word “console” on it if you aren’t hovering over anything. This is the console. Here, you can type in commands and see hints as to what buttons do. Commands will be covered in a later chapter.

Under the right side of the model view are four buttons. Each one corresponds to a different way to view the model.

Pers: perspective camera (perspective view)
Free: free (perspective) camera (use W, A, S, D, Q, and E to move around)
Orth: orthogonal camera (orthographic view)
Iso: isometric camera (fixed orthographic view)
The very last part that this chapter will be covering is at the very lower right of the model view. The two vertical buttons are camera views (I’m still working on figuring out how to use them). The 3 boxed in the shape of a backwards “L” toggles the camera ruler (I’m still figuring out how units correspond to voxels). The semi-circle with an arrow pointing to the middle resets the camera. The yellow box to the right toggles the auto camera reset (still working on this too).

And that’s all for Chapter 2! Chapter 3 will be coming soon (maybe?).
In this lesson (the last part of Chapter 2) you’ll be learning how to use the center part of MagicaVoxel 0.98. As promised in the last section, I’ll explain my reasoning behind skipping this part. I found that it’s best to learn the essentials of the program before getting started, and if you knew how to use the middle part, you probably wouldn’t read the rest of the tutorial.
Open up the program if it isn’t already open. As always, you’ll be greeted with the default screen.
We’ll be focusing on the sections shown below.
The two tabs in the top left, “Model” and “Render”, switch the main view between editing mode and viewing mode, also known as modeling and rendering mode.
The big long bar with the word “Name” in the center presents the name of the model that’s currently open. Click it to rename your model. There is a small button at the very right of this bar. It will turn orange when changes are made to your model. Click it to save your model.
The tab directly below “Model” and “Render” is titled “anim”. We’ll be covering this in a later chapter, but as an overview, clicking on this will allow you to animate your model.
Near the lower right of the name bar is a text field with the word “Size” to the left of it and the letter “F” to the right. The text field allows you to resize the canvas are of your model. The maximum size is 126x126x126. Put spaces in between numbers to separate them. Type one number without spaces and hit “Enter” or “Return” on your keyboard to make all canvas dimensions that number. The “F” to the right of the text field fits the canvas size to the current size of your model.
The large view in the middle, also known as the model view, is where you edit your model. To edit your model, select a button from the sidebar directly to the left of it, such as “Attach”, “Erase”, or “Paint”. The functions of these buttons are explained in the first part of Chapter 2. To use the selected function, left click on a block in the model area. If you right click and drag in the model view, the view will orbit around the center of the model. If you orbit and explore the model area, you will see a green, blue, and red line. The green line is the y axis, the blue line is the z axis, and the red line is the x axis. The white lines surrounding the model are the canvas boundaries.
To the lower left of the model view are two buttons. One looks like a camera and the other is the letter “A”. The camera takes a screenshot of the current model view. The “A” toggles the alpha channels of the screenshot (I’m not sure what this does yet).
The long black bar underneath the model view should have the word “console” on it if you aren’t hovering over anything. This is the console. Here, you can type in commands and see hints as to what buttons do. Commands will be covered in a later chapter.
Under the right side of the model view are four buttons. Each one corresponds to a different way to view the model.
Pers: perspective camera (perspective view)
Free: free (perspective) camera (use W, A, S, D, Q, and E to move around)
Orth: orthogonal camera (orthographic view)
Iso: isometric camera (fixed orthographic view)
The very last part that this chapter will be covering is at the very lower right of the model view. The two vertical buttons are camera views (I’m still working on figuring out how to use them). The 3 boxed in the shape of a backwards “L” toggles the camera ruler (I’m still figuring out how units correspond to voxels). The semi-circle with an arrow pointing to the middle resets the camera. The yellow box to the right toggles the auto camera reset (still working on this too).
And that’s all for Chapter 2! Chapter 3 will be coming soon (maybe?).


